Saturday, January 29, 2022

Simple Techniques Yield Big Flavor


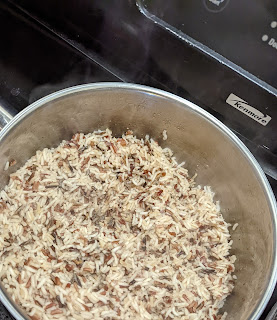
Quite often it's not just the ingredients, but the preparation techniques that can really enhance the flavor of a simple dish. Take, for example, wild rice. I like it, but it can be a bit bland on its own. There is one simple technique that can make it more flavorful: toasting. While you're toasting the rice, toss in the seasonings. It's a tiny change, but will yield tasteful results!

This recipe is based on the package directions.

Toasted Wild Rice

1 c. Rice Select Royal Blend
1/2 t. salt (or to taste)
1/4 t. ground black pepper (or to taste)
1 t. butter or preferred oil
1.5 c. broth (may use meat-based or vegetarian)

Using a pan that's big enough to hold 3 cups, heat the pan until the bottom is hot. Add the rice and seasonings and toast until fragrant but not burnt. Add the broth (watch out for the steam!) and bring to a boil, then turn down to simmer. Cover and stir frequently until liquid is almost absorbed. Turn off heat and let steam, covered, until desired texture. Delicious on its own, as a side dish, or in a casserole.

Simple, but yummy!

What's cooking in your Savory kitchen?

Tuesday, December 7, 2021

Laid-Back Thanksgiving Chicken


    One of my goals for this Thanksgiving was that it be laid-back and easygoing. To avoid what I imagined would be chaotic crowds at the stores, on Monday night I ordered all of my groceries online for pickup on Tuesday or Wednesday morning. Tuesday's order was the bigger one, but I was notified just before pickup time that it would not be ready. I called the store and, though they were extremely polite, they could not guarantee that my order would be ready on Tuesday or even Wednesday. Wednesday morning, I was notified that my small Wednesday order would also be delayed.

    So much for easygoing.

    So, early Wednesday morning I headed to the store, expecting to encounter utter bedlam. The store was well-stocked but surprisingly thin on customers. The store had everything but the star of Thursday's feast, the chicken. With my car loaded like a supply wagon, I drove to another grocery, again finding few people, but picking up a nice roasting chicken.

    I had planned to season then roast the bird in the slow cooker when I arrived home. 

    The chicken was still icy on the inside. One thing my mother drilled into me was that it is not safe to roast partially frozen poultry, and I did not have time to thaw the chicken in the refrigerator. 

    Thinking worriedly, I remembered a Facebook post where a friend had spatchcocked and dry brined his turkey so that it would cook more quickly and evenly. Hoping it would also thaw more quickly, I used kitchen shears to cut the ribs and remove the backbone. I flipped over the bird and tried to crack the sternum with a CPR compression. This did not work for me. Hoping to avoid splattering chicken juice all over the kitchen, instead of pounding it with the meat mallet, I placed the meat mallet on the sternum and pounded on it with a bone hammer. I was eventually successful, but only after hammering my thumb in the process. I rubbed smoked paprika, ground thyme, garlic powder, onion powder, salt, and pepper into the skin. While this was okay, my husband agreed that our next chicken would be seasoned with good old seasoning salt. 

    While the chicken thawed/marinated, I dug out my cheap steamer basket and set it inside my 6 quart oval slow cooker. Some recipes recommend using chopped vegetables to lift the chicken out of its grease, but I just put about a half-inch of water in the bottom of the crock. When thawed, I transferred the splayed marinated chicken on the steamer basket, put the lit on tightly, and set it to cook on low for 8 hours. It, a 6.5-pound chicken, was done (165 degrees at the thigh) after 4 hours. For safety, always use a thermometer with poultry to test for doneness.

    I cooked it on Wednesday, so I transferred the chicken to a shallow casserole, covered it with foil, and refrigerated it overnight. On Thursday, I warmed the chicken in the oven at 170 degrees. It remained moist and flavorful.

    Caveat: the skin will be soft, so you would need to bake it a bit if you desire crispy skin.

    The best thing about this method, and what made Thanksgiving cooking so laid-back this year, was that the oven was not monopolized by the bird and was, therefore, available to bake scalloped potatoes, corn pudding, and rolls, and to roast brussel sprouts, all at the same time. It was wonderful.

    My goal of a laid-back Thanksgiving was achieved. Instead of rushing about the kitchen, I was able to spend time with my family. For that, I am extremely thankful.

    What's cooking in your kitchen?


Saturday, February 13, 2021

Kicking the Starbucks Habit

After a long hiatus, I'm back and working on getting healthy, which includes losing weight. For the past year, I've "fallen off the wagon" and indulged myself in a Starbucks frap every morning with predictable results. It's a new year, and I'm back to working on improving the old me.

First, I'm not criticizing Starbucks! As a business model, they have it all figured out. But, apparently, I am addicted to sugar and their fraps have plenty. They are yummy. But I cannot have them regularly, so I must look for alternatives. I've been tinkering with a smoothie recipe and have made it even easier.

The key for me, however, has been finding a smoothie cup that fits my old, old Osterizer blender. It's absolutely wonderful, but sort of short on good accessories for the smoothie craze. Yes, there is a cup, but the reviews are awful. One of the wonderful things about my beloved Osterizer blender is that the blade assembly is the same size as a regular mouth canning jar. You can see where I'm going here. Being the cautious soul that I am, I tried it, but I made sure that I surrounded the jar with a heavy dishtowel while blending, just in case. Try at your own risk, folks, and practice safe blending.

To make it even more special (and to get those lids with the straw hole in them) I treated myself to sapphire drinking jars by Pioneer Woman for my long commute. They are a perfect size, with the exception of not fitting in the cup holders in my car. Anyway, here's the recipe:

Sugar-Free Stevia Chocolate-Banana Smoothie
1 c. unsweetened organic vanilla almond milk
2 t. Hershey's Special Dark cocoa
1 banana, frozen in 1-inch chunks
4-5 drops Sweet Drops liquid stevia (chocolate and toffee flavors for me)

If you use any tinctures or other healthy additives, put them in before blending. Blend on low to grind the bananas, then pulse on high to whip air into your smoothie. Yum!


Friday, June 15, 2018

Whipping Up a Sweet Treat

Well, it's summer, which means I'm on another weight-loss kick. One of my biggest temptations is a Starbucks frappuccino. Calories, calories, calories! So, I'm experimenting at home with stevia drops, a sugar-free sweetener. My first few attempts were okay, but not quite right. Today's effort is the closest yet, and here is the recipe:

Sugar-Free Stevia Smoothie

1 c. 365 unsweetened organic almond milk
1 t. Hershey's cocoa
1/2 banana
1/8 t. Watkins vanilla
6-9 drops Sweet Drops liquid stevia
4 cubes ice

Blend until frothy. On its own, the almond milk taste a little thin. The banana gives it a creamier texture. This may become my morning commute treat!

What's cooking in your kitchen?

Nancy

Sunday, April 22, 2018

Ghee, It's Been a Long Time!

Yes, it's been months since I posted. Between family, work, school, and church, I've been on the run constantly. Life has finally slowed a bit, and I took the opportunity to do a tiny amount of cooking yesterday. Mind you, the Resident Dragon is still the primary cook, but, ghee, I was inspired.

I've been wanting to try cooking with ghee for a while and intended to pick up some at the grocery yesterday. Then I saw the price: $13 for 12 ounces. Well, it was grass-fed and organic, but $13! I quickly looked up a few recipes and priced a pound of unsalted butter: $2.50 (not grass-fed and not organic). I decided to take the chance.

My goodness, how easy it was! Ghee is, basically, clarified butter. You melt the butter over medium heat until the water boils off and the milk solids brown. Then you strain it through a cheesecloth. The remaining oil will, supposedly, keep for a month unrefrigerated, but I am not taking any chances.

Of course, I had to try it, so I scrambled some eggs. They were buttery and delicious. Now I'm on the lookout for other recipes where I could substitute ghee. I wonder how sauteed mushrooms would taste?

So, hope this finds you well, and you find this useful.


Wednesday, July 12, 2017

Super Savory Summer Squash Casserole

One of the things I love about this time of year is the way friends and neighbors trade produce. A friend gave me a few yellow squash and I could not resist making a casserole. I've become quite a lazy cook, so I took advantage of a few shortcuts. Here's the result.

Super Savory Summer Squash Casserole

4 summer squash, washed and thinly sliced
1/2 bag (14 oz.) Pepperidge Farms stuffing mix
1 pint half and half
5 eggs
Salt, pepper to taste

Preheat oven to 350 degrees. Microwave (or cook on stove top) seasoned (salt and pepper to taste) squash with about 1/4 cup water until done, 5-7 minutes. While squash is cooking, prepare shallow casserole dish. In a mixing bowl, beat together half and half and eggs.

When squash is done, layer it with stuffing mix starting and ending with the stuffing. Pour egg mixture evenly over squash. Sprinkle a light layer of stuffing crumbs over top.

Bake at 350 degrees for 20-25 minutes. Let sit for 5 minutes before serving.

Yum!

Saturday, July 18, 2015

Road Trip Back to the 50s: Kokomo's 50s Diner

One of our favorite things to do is, of course, eat. One a recent trip I spotted a copy of Anita Musgrove's Tennessee Back Road Restaurant Recipes: A Cookbook and Restaurant Guide. It has a selection of small-town restaurants separated according to the three Grand Divisions of Tennessee. A quick look gave me the idea to use this as a sort of road map for some Saturday afternoon road trips.

One warning about the book: be alert as you read. We were looking for dishes made from the recipes in the book but discovered that some of the restaurants list "family favorites" and "local favorites" instead of actual restaurant recipes.

We took the first today, heading toward the Tennessee River. Our first stop was a the Toll House Restaurant in Savannah. My open-faced steak sandwich was unremarkable, but Jim ordered a loaded baked potato with chopped chicken and barbecue sauce. It was huge and he really enjoyed it. We were surprised to find they were out of desserts at Saturday lunch, so we headed to another place featured in Musgrove's book, Kokomo's 50s Diner in Adamsville, Tennessee.

What a great surprise! First off, we were greeted with the aroma of luscious hamburgers and decor straight out of, well, the 50s! Since we were only there for dessert we ordered a caramel sundae and a hot brownie cake sundae. Wow! They were a perfect treat on a wickedly hot day.

It was a lovely trip, showing us, again, the value of eating at local restaurants.

What about you? Where is your next gastronomic road trip?

Nancy


Thursday, July 9, 2015

Zucchini Undercover: Double Chocolate Zucchini Bread

Freeze pureed or shredded zucchini
 in recipe-sized batches.
Around this time of year, the zucchini is in full crop. In fact, some folks have reported finding bags of zucchini abandoned on their doorsteps! Okay, maybe not, but if you're wondering what to do with all of that zucchini goodness, try this Double Chocolate Zucchini Bread. It's based on recipes from colagal at Allrecipes.com and the Cooking Channel. I've sort of spruced them up and here's the result:

Double Chocolate Zucchini Bread


3 cups pureed zucchini
1 cup buttermilk
1 cup olive oil (NOT EVOO)
2 t. vanilla extract
4 eggs
2 1/2 cups unbleached white flour
1 1/2 cups sugar
1/2 cup cocoa
2 t. baking powder (low-sodium, aluminum-free)
1 t. baking soda
1 t. salt
1 cup chocolate chips
2 cups chopped pecans (optional-reserve 1/2 cup for topping)

Preheat oven to 350 degrees and oil 2 loaf pans.

Whisk eggs, buttermilk, olive oil and vanilla extract until well-mixed, then mix in zucchini. In a large bowl, stir together flour, sugar, cocoa, baking powder, soda and salt. Add zucchini mixture and stir until just mixed. Do not overmix. Fold in chocolate chips and pecans, then turn into prepared loaf pans. Sprinkle nuts over loaves.

Two loaves fresh from the oven (no, there are no pecans).
Bake for 55 minutes to an hour. Cool pans on rack for about 30 minutes, then turn loaf onto rack. Wrap well and store in refrigerator for up to a week (I guess; we've never had a loaf last that long!) or freeze.

Who would have thought that zucchini could be so yummy! Enjoy!

What's cooking in your Savory kitchen?

Nancy


Saturday, December 27, 2014

Individual Tiramisu Cakes

Individual Tiramisu Cake
One of the things I enjoy most about the holidays having time to cook things that are a little more time-consuming.  As I do every year, I sent out a family text soliciting menu requests.  Of course, many were the usual turkey, ham, broccoli casserole and the like, but one request harked back to several years ago:  Tiramisu Bowl Cake.

Given that our family has begun eating less, rather than prepare an entire bowl cake, which presumes that we would eat the entire thing in one sitting, I decided to prepare individual servings of Tiramisu Cake.  I searched (um, Googled) far and wide for a recipe that had the wonderful taste without some of the more excessive time requirements and found a delicious Tiramisu Layer Cake by bettina on Allrecipes.com.

Rather than repeating the entire recipe here, I'll list my adjustments:


  • White Cake Mix (Duncan Hines, of course):  
    • use olive oil (NOT extra-virgin!!!) instead of vegetable oil
    • use 2 whole eggs rather than 3 egg whites
    • bake in self-supporting muffin/cupcake papers (which gives room for the topping) for 15 minutes
  • Cupcakes may be made several days in advance
  • Fill the cupcakes with the marscapone mixture (any large tip--I used Wilton 1G) after soaking with coffee liqueur.
  • Dust the top of the filled cupcake with cocoa.
  • Frost with flavored whipped cream and dust with cocoa.
  • Refrigerate until ready to serve.
  • Freeze leftovers to enjoy later!
These are a beautiful and delicious addition to any holiday table!

What about you?  What's cooking in your Savory kitchen?

Nancy

Sunday, December 14, 2014

Fast Festive Treats: No-Fail Microwave Fudge

While I'd like to tell you that I have all the time in the world for preparing holiday treats--like our family's Traditional Dipped Fruit--but this year has been extremely busy.  It's been so hectic that I finally prepared my first batch of fudge just a few days ago.

My daughter is working, and in need of treats for office holiday parties, so I shared my Always-Reliable Microwave Fudge recipe with her.  I do have a more traditional recipe, but it can be affected by humidity, so I've been relying more and more on the microwave recipe.  Here 'tis; I hope you find it as fool-proof as I have.
Cut into 1" squares.

Always-Reliable Microwave Fudge

1 pound confectioner's sugar (sifted)
1/2 cup cocoa (sifted)
1/2 stick of butter (4 tablespoons)
1/2 cup evaporated milk
1/2 cup pecans (optional)
1 t. vanilla

In a microwave-safe bowl, stir together the sugar and cocoa.  On top, add the butter and milk, but do not stir.  Microwave for 2 minutes.

Immediately, stir in vanilla and nuts.  This sets up very quickly.  Spread about 1/2" thick on waxed paper and chill until firm, about 15 minutes.  Cut into 1" squares as it is very rich.

Serve on a lovely paper doily or in tiny fluted candy papers.

You'll be the hit of the party!

What's cooking in your Savory kitchen?

Nancy


Friday, August 1, 2014

Adding a Little Culture to My Life

New fun for an old kitchen friend!
My creative muse swooped by recently (after a long vacation) with a wild idea.  I've been wanting to add natural probiotics to my diet, but flavored yogurt is really expensive, and full of additives.  So, I did a little research and found an easy method at Cultures for Health for culturing yogurt at home using my ancient slow-cooker.  Nothing could be simpler!


  • First, I cleaned the crock really well and found a heavy lid (rather than the glass one) that would fit tightly and retain heat.  Per the recipe, I added 1/2 gallon milk; I used Kroger Simple Truth Organic Whole Milk because Kroger is closer than any health food store.  I put on the lid, then turned the slow cooker on low for 2.5 hours while I did many other things.


  • After 2.5 hours, I turned off the slow cooker and let it cool (with the lid on) for 3 hours.


  • After 3 hours, I took out 1/2 cup and whisked in 2 T. of purchased yogurt with live cultures.  I used Greek Gods Plain Yogurt (which is, sadly, not organic) because it contained a variety of live cultures (S. Thermophilus, L. Bulgaricus, L. Acidophilus, Bifidobacerium, L. Casei) and only pectin rather than gums.  You can also used a purchased yogurt starter as well as one shared from a friend.  Then I returned the culture mixture to the slow cooker, stirring well before replacing the lid.

Culturing the yogurt

  • The final active step is allowing the mixture to culture:  I wrapped my slowcooker, unplugged heating element and all, in two heavy bath-sheet size towels and left it overnight.  The instructions advise culturing for 8-12 hours depending upon how tangy you like your yogurt (more time=more tang).  I try to culture mine for 8-9 hours as I prefer a less tangy yogurt.


  • When your yogurt has achieved the desired "tang" spoon gently into jars and refrigerate at least 8 hours before using.  Reserve about 2 T. in a separate container to start your next batch.  Keeps for several weeks in the refrigerator.

The "busy mom" mild yogurt culture schedule
5:00 p.m.  Pour milk into slow cooker and turn on low heat.
7:30 p.m.  Turn off slow cooker; let set
10:30 p.m. Add culture starter and wrap in towels.
6:30 a.m.  Spoon into jars and refrigerate (reserve about 2 T. in its own container to make your next batch!)
2:30 p.m.  Ready to enjoy!

If you want "Greek" style yogurt, place some coffee filters in a plastic colander and allow some of the whey to drain off (frugal folk can use the whey in baked goods!).

You're only limited by
 your imagination!
Currently, I am enjoying my yogurt with fruit (fresh and preserves) and bran nuggets for crunch.  I have plans to make a healthy muesli and even a savory mixture for variety.

Why am I bothering with making my own yogurt?  I've read several articles that additional probiotics help lower blood pressure while I continue to take my prescribed medications.  I've also read several articles that probiotics help boost immunity while increasing metabolism.

Please consult your medical professional about this!  I am NOT a doctor nor do I even play one on TV!

With my next batches, I hope to make some yogurt cheese (Alton Brown makes it sound so easy!) and add some of my home-grown organic garlic and herbs to spread on toast and sandwiches.  I also have my eye on frozen yogurt.  I might even make a yogurt cheesecake!

Healthy, frugal, easy--I encourage you to give this a try!

What about you?  What's cooking in your Savory kitchen!

Nancy


Monday, January 27, 2014

Warm Up a Winter Dinner with Roasted Vegetables

Squash and zucchini make great partners!
One of my new year's resolutions was to eat more vegetables and, last week, I finally put that plan into motion.  The greengrocer had beautiful produce and I treated myself to an assortment.

Aside from potatoes, I've never been much of a vegetable eater.  Most of the vegetables I've tried in the past have been boiled to the point of sliminess.   A few years ago, we discovered just how wonderful slimy asparagus was when it was when roasted.  Since then, we've roasted potatoes and mushrooms.  The selection of fresh produce prompted us to try roasting more vegetables.

Roasted brussel sprouts and asparagus
disappear quickly!
Jim was the entremetier.  His recipe for squash is below, and he prepared halved brussel sprouts and asparagus similarly.  The same general technique can be use for potatoes, carrots, mushrooms, and many other "winter" and "summer" vegetables.

Roasted Summer Squash


2 medium to large summer squash, sliced
2 medium to large zucchini, sliced
1 small onion, thinly sliced and separated into rings
2 T. olive oil
1 T. white balsamic vinegar
1 t. salt
1/4 t. pepper

Arrange squash, zucchini and onion into a prepared 9x13 baking dish.  Drizzle them with olive oil and white balsamic vinegar and season with salt and pepper.  Roast on an upper rack in a 400 degree oven until lightly browned, about 30 minutes.

All were wonderful, savory, and very satisfying on a cold, winter evening.  Enjoy!

What's cooking in your Savory kitchen?

Nancy

Wednesday, January 1, 2014

Dragon's Grilled Chicken Salad

What a great sandwich!
Well, Jim's been in the kitchen again and he came up with a new chicken salad recipe that's too spicy for your grandmother's garden party!  Give this one a try:

Grilled Chicken Salad

6 boneless chicken thighs
1 bottle sesame ginger marinade (Kroger)
4 eggs, hard-boiled, peeled, and chopped
2 dill pickles (diced)
2 T. pecan pieces (chopped)
1 c. seedless red grapes, halved
1 c. mayonnaise with olive oil
1/4 c. sour cream
1 t. spicy mustard
1 T. onion soup mix
1 T. dill weed

Marinate thighs in marinade overnight.  Discard marinade and cook or grill thighs until done.  Let cool, then cut or pull into small pieces.  Mix mayonnaise, sour cream, mustard, onion soup mix, and dill weed and set aside.  Toss together chicken, eggs, pickles, pecans, and grapes before adding mayonnaise mixture.  Mix well, then chill for several hours before enjoying on crusty bread or savory crackers.  Makes about 2 quarts of chicken salad.

Variation:  Substitute sun-dried tomatoes for the grapes!

We hope you enjoy!

What cooking in your Savory kitchen?

Nancy

Wednesday, December 25, 2013

Savory Scalloped Potatoes


Delicious scalloped potatoes


8 medium red-skin potatoes, scrubbed, "eyed," and cut into 1/8" to 1/4" slices
3 T. butter
4 T. onions, finely chopped
1 T. minced garlic
1/4 c. flour
salt & pepper to taste
1 c. chicken broth (or vegetable), room temperature
3 c. heavy cream, warmed to room temperature
1/3 c. sour cream
1 c. crushed cornflakes
2 T. butter

Boil potatoes for about 5 minutes until just before fork-tender.  

Saute onions and garlic in butter until translucent, then add flour, salt, and pepper.  Stir constantly until flour has cooked and is smooth, but not browned.  Add broth, stirring over heat until well-mixed.  Add heavy cream, stirring constantly until it just begins to thicken.  Add sour cream

When potatoes are ready, carefully drain and line prepared 10x13 pan with half.  Pour half of sauce over, then top with remaining potatoes.  Spread remaining sauce over potatoes.

If you prefer a topping, crush cornflakes, then toss in melted butter.  Spread on potatoes.

Cover and bake in 350 degree oven for 30 minutes or until potatoes are done and slightly browned.

Luscious, rich, and satisfying--wonderful for our Christmas dinner.

What's cooking in your Savory kitchen?

Nancy


Thursday, October 10, 2013

Forfend Fast Food: Weeknight Chili

Luscious, quick, pantry-based!

Weeknight Chili

2 pounds of ground beef
2-3 cloves of crushed garlic (to taste)
1 can of Rotel with cilantro and lime
1-2 T. chili powder
1 can of dark red kidney beans, undrained
1 can of whole kernel corn, drained
4 cans of tomato sauce

In large stock pot, brown ground beef then remove from pot and drain.  To pot (with meat bits) add crushed garlic and soften a bit before adding chili powder, then Rotel.  Saute until tomatoes are soft.  Add meat back to pot and add kidney beans and tomato sauce.

Simmer for 30 minutes.  Serve with Martha White Sweet Yellow Corn Bread, sour cream, and shredded cheese.  Serves a bunch.  Keeps for a while in refrigerator.  Freeze in individual serving containers for lunches or quick suppers.

Tuesday, September 10, 2013

Pantry Shopping: Red Quinoa Sloppy Joes

Well, it's "pantry-shopping" time of the pay period here on the farm and this is what I selected:

red quinoa
tomato sauce
Rotel tomatoes
mushrooms
buttermilk cornbread mix

The idea was for quinoa sloppy joes on cornbread.  Since they turned out tasty, here's the recipe:

Red Quinoa Sloppy Joes


1 cup red quinoa, washed, rinsed
9-oz. can Rotel with lime and cilantro (may run through blend until smooth)
1/2 package onion soup mix (or more, to taste)
1 cup water
1/2 t. salt
29-oz. can tomato sauce
4-oz. can mushrooms, drained

In a large sauce pan, bring quinoa, Rotel, onion soup mix, and water to a boil.  Cook until quinoa is translucent and germ ring appears, when it has nearly absorbed the liquid.  Add salt, tomato sauce, and mushrooms and simmer until heated through.  Serve over toasted buns, chips, or cornbread.  Serves 4.

The chewy texture of the quinoa gives it some "tooth." What's your favorite quinoa recipe?

So, what's cooking in your Savory kitchen?

Nancy


Monday, August 12, 2013

Canning Can-Do: Italian Sauce

Italian Sauce will be great
on a cold winter evening!
I've been steadily canning plain tomatoes, but, since we eat a lot of spaghetti during the winter, I decided to put up some Italian Sauce.  Bear in mind that, if you add meat, you MUST process it in a pressure canner.  We don't mind the seeds in our spaghetti sauce, so I do not remove them.

Italian Sauce

1.5 gallons tomatoes (run through blender)
6 cups finely chopped onions
1 finely chopped sweet red pepper, seeded
9 T. minced garlic
2 T. Italian seasoning
2-3 T. salt (to taste)
1 t. freshly ground black pepper
2-3 T. olive oil

Place olive oil in a stock pot until hot.  Add everything but tomatoes and bay leaves and cook until onions are clear.  Add tomatoes and bay leaves and simmer until reduced by nearly half.

Pack into hot jars, add lemon juice, and process in water-bath canner as follows:

Size                Lemon juice            Processing time
Pint                    1 T.                    35 minutes
Quart                  2 T.                    40 minutes

Enjoy!

Thursday, August 8, 2013

Canning Can-Do: Saucy Salsa

It's worth the work!
Salsa is a favorite treat in our household, so, of course, I thought I'd try canning a few jars.  We prefer ours a bit on the sweet side, so we add a bit of lime juice.  Here's what we came up with:

Saucy Salsa

10 c. tomatoes, finely chopped
5 c. sweet red peppers, seeded & chopped finely
5 c. finely chopped sweet onions
3 large seeded jalapeno peppers, finely chopped
1 c. cider vinegar
0.5 c. lime juice
4 T. chopped garlic
1 T. salt (or to taste)
2-3 T. minced cilantro

Aren't they lovely?
Combine in non-reactive stock pot and cook until onions are clear.  Seal in hot half-pint or pint jars and process in water-bath canner for 15 minutes.  Yield:  7 pints


Monday, August 5, 2013

Relishing Your Food: Piccadilly Dill Chow Chow

Last week I wrote about my latest batch of chow chow, but realized that I was ignoring the dill-lovers in the family.  I was a bit nervous about it, but both the dill-lovers in the house have added it to several sandwiches!  So, here's my take on Piccadilly piccalilli:

Dill chow chow is a bit greener
than regular chow chow!

Piccadilly Dill Chow Chow

1.5 c. chopped green tomatoes
4 c. chopped cabbage
2 c. chopped onions
2 c. sweet green pepper, chopped, seeds removed
0.5 c. pickling salt
4 c. vinegar
2 T. sugar
2 T. minced garlic
4 t. pickling spices
3 T. brown mustard seed
2 T. dill seed
1 t. turmeric
1 c. water

Mix vegetables together and place in gallon jar.  Dissolve salt in 8 cups of warm water; pour over vegetables and let stand in a cool place overnight.  Drain, and press dry.  Tie pickling spices, 2 T. mustard seed, & 5 t. dill seed into double coffee filters.  Warm vinegar and add sugar, garlic, turmeric and spice bags into vinegar; simmer for 5 minutes, add vegetables and remaining spices (1 t. dill seed, 1 t. mustard seed) into vinegar and simmer for 15 minutes.

Remove spice bags, then seal in half-pint jars, leaving 0.25" headspace.  Process in boiling water-bath canner for 10 minutes.

Friday, August 2, 2013

Relishing Your Food: Chow Chow

The melange of vegetables really shines
in this less-sweet version of the classic relish.
In my childhood, purple hull peas were frequently part of the menu.  When you eat as many as we did, you need a little something to spice up the flavor.  My grandmother often made what we called Chow Chow, but is known in many other places as Piccalilli.  Since you rarely see it in the grocery, and I'm in canning mode this summer, I decided to try making some of my own.  I do not have my grandmother's recipe so I turned to one of my favorite cookbooks:  Blue Ribbon Recipes.


Hint:  Give yourself a break and use your
food processor to chop the vegetables finely.

Chow Chow Relish


1.5 c. chopped green tomatoes
4 c. chopped cabbage
2 c. chopped onions
2 c. chopped sweet red pepper, seeds removed
0.5 c. pickling salt
3 T. mustard seed
2 T. celery seed
1 T. pickling spice
1 t. turmeric
4 c. vinegar
1.5 c. sugar

Mix vegetables together and place in gallon jar.  Dissolve salt in 8 cups of water; pour over vegetables.  Cover with dishcloth or coffee filter and let stand in a cool place overnight; drain, pressing out liquid.  If too salty, rinse and drain again.  Tie spices (except for ground turmeric which you add directly to vinegar) in cheesecloth or coffee filter.  Add to vinegar and 1 c. water; let simmer 5 minutes.  Add sugar; stir until dissolved.  Add vegetables; simmer 15 minutes.  Bring to a boil; pack into hot jars leaving 0.25" headspace.  Process 10 minutes in water bath canner.  Makes 5-6 half-pints.

I'm already enjoying the fresh summer taste!  What about you?

What's cooking in your Savory kitchen?

Nancy